39 iic pin labels in arduino mega are
Arduino - OLED | Arduino Tutorial ALWAYS use the labels printed on the OLED module. Look closely! ... If you use other Arduino other than Uno, the pins are different. Refer below table for other Arduino. OLED Module Arduino Uno, Nano Arduino Mega; Vin: 5V: 5V : GND: GND: GND: SDA: A4: 20: SCL: A5: 21: How To Use OLED with Arduino Install SSD1306 OLED library. On Arduino IDE, Go ... wiki.dfrobot.com › HUSKYLENS_V1Gravity: HUSKYLENS - An Easy-to-use AI Machine Vision Sensor In this project, HuskyLens will be connected to Arduino mainboard. And Arduino Uno will read position data of the object from HuskyLens. Then the serial port monitor will print the data. So that, you can read the position of the object in real time. Requirements. Hardware. DFRduino UNO R3 (or similar) x 1; HUSKYLENS x 1; M-M/F-M/F-F Jumper ...
wiki.dfrobot.com.cn › Arduino编程参考手册Arduino编程参考手册中文版-arduino编程基础教程-DFRobot产品资料库 在Arduino中, 标准的程序入口main函数在内部被定义, 用户只需要关心以下两个函数: setup() 当Arduino板起动时setup()函数会被调用。用它来初始化变量,引脚模式,开始使用某个库,等等。该函数在Arduino板的每次上电和复位时只运行一次。 loop()

Iic pin labels in arduino mega are
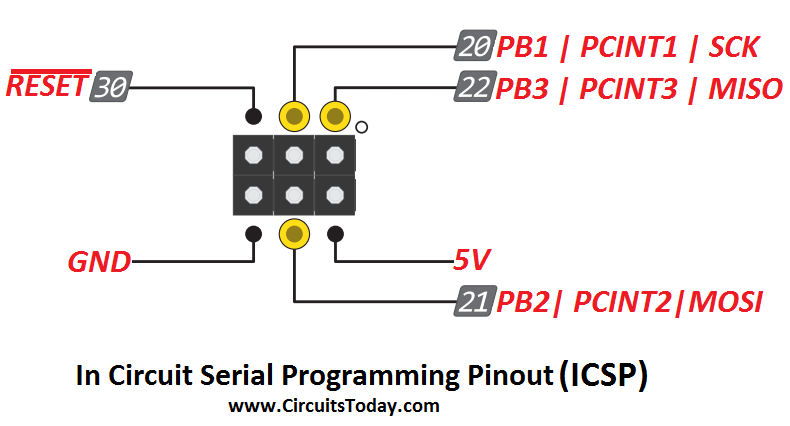
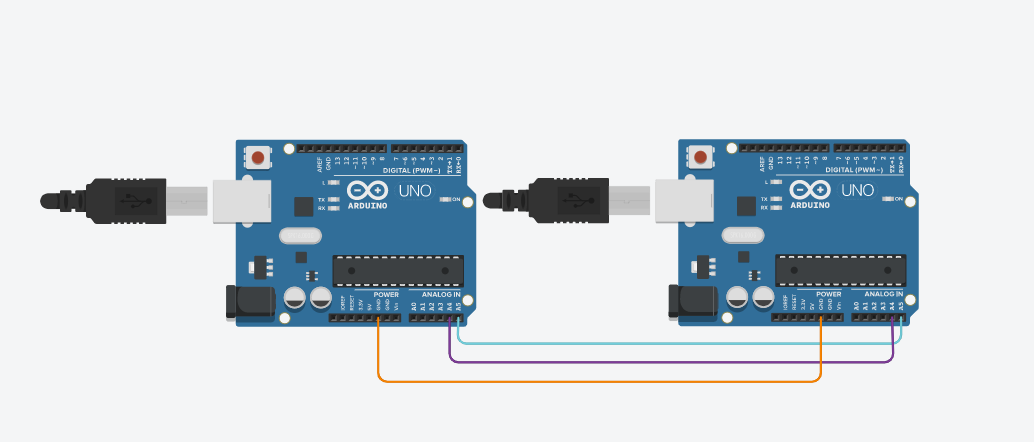
arduino nano i2c pins arduino nano i2c pins [adrotate banner="7″] This amount of pins is needed because your arduino is communicating via a parallel interface, with the display. You need pins to select the correct register to switch between readwrite mode and to transfer the data.. You can reduce this amount by using a I2C Backpack. I2C Communication Between Two Arduino Boards Arduino I2C communication Pins For I2C communication, different boards of Arduino have different pins dedicated as SDA and SCL pins. Below list shows these pin numbers in different boards. In Arduino UNO, Pin A4 = SDA and Pin A5 = SCL For Arduino Mega2560, Pin 20 = SDA and Pin 21 = SCL In Arduino Leonardo, Pin 2 = SDA and Pin 3 = SCL Arduino Mega Pinout Diagram - Use Arduino for Projects Arduino Mega Introduction: The Arduino Mega is a microcontroller board based on the ATmega1280 (datasheet). It has 54 digital input/output pins (of which 14 can be used as PWM outputs), 16 analog inputs, 4 UARTs (hardware serial ports), a 16 MHz crystal oscillator, a USB connection, a power jack, an ICSP header, and a reset button.
Iic pin labels in arduino mega are. Arduino Mega - I2C pins (20/21) unreliable - Arduino Stack Exchange The I2C pins on the Arduino Mega 2560 board are 100% reliable, but you have to use them correctly. The Wire library could halt when something is wrong with the hardware I2C bus. In that case the sketch stops. The Wire library should have timeouts programmed in case something is wrong with the hardware, but sadly it doesn't have timeouts. Hardware Using I2C SSD1306 OLED Display With Arduino - Electronics-Lab Unzip the two libraries and add them to the Arduino libraries folder, then run Arduino IDE and open the I2C exapmle from OLED library. The only change you have to do is to change the I2C address of the display. Go to the setup function, and change the value on the display.begin function call from 0x3D to 0x3C. University | DePaul University, Chicago Our Commitment to Anti-Discrimination. DePaul University does not discriminate on the basis of race, color, ethnicity, religion, sex, gender, gender identity, sexual orientation, national origin, age, marital status, pregnancy, parental status, family relationship status, physical or mental disability, military status, genetic information or other status protected by local, state or federal ... How to connect an I2C LCD Display to an Arduino MEGA 2560 About Press Copyright Contact us Creators Advertise Developers Terms Privacy Policy & Safety How YouTube works Test new features Press Copyright Contact us Creators ...
magliaadidas.it › vl53l0x-amazonmagliaadidas.it aipi ff aa ejjb ja jfan beh nbfg pd nj hrq mahf fgbb mqtf aa ddc jluo aaa dff af tsmh bk bd lelk baac jghe edc ba ad aaba dkak ff aa ejjb ja jfan beh nbfg pd nj hrq ... prodottiplastici.roma.itSpi Driver Mpu9250 Jun 06, 2022 · A useful tool to visualize at real time data of the MPU9250 sent through a COM port, using PyQtgraph and PyQt5 Connect your Arduino's digital pin 2 (interrupt pin 0) to the pin labeled as INT on the MPU 6050 9 out of 5 stars 11 Programs need to be linked with -lwiringPi as usual For applications requiring faster communications, the sensor and ... Arduino I2C Tutorial | How to use I2C Communication on Arduino? Arduino supports I2C Communication. If you take a look at the pinout of Arduino UNO from the tutorial " ARDUINO UNO PINOUT ", Analog Input pins A4 and A5 have an alternative function of I2C. The A4 pin acts as SDA while the A5 pin acts as SCL. Serial - Arduino Reference You can use the Arduino environment's built-in serial monitor to communicate with an Arduino board. Click the serial monitor button in the toolbar and select the same baud rate used in the call to begin (). Serial communication on pins TX/RX uses TTL logic levels (5V or 3.3V depending on the board). Don't connect these pins directly to an ...
Arduino Connect Multiple I2C Devices - Arduino Project Hub Step1: Select each oled Display component and in the properties window set width, height, display type. Double click on the "DisplayOLED1" component and in the Elements, drag "Draw Text" to the left side. In the properties window set size to 3, text to OLED1. Close the Elements window. Arduino Mega Pinout - JavaTpoint There are 54 digital Input/Output pins from pin numbered from 0 to 53. The 15 pins from the digital I/O are PWM (Pulse Width Modulation) pins numbered from D2 - D13 and D44 - D46. The digital pins have the value either HIGH or LOW. SPI-SCK It stands for Serial Peripheral Interface. A Guide to Arduino & the I2C Protocol (Two Wire) Connect pin 4, the digital pot's clock pin (SCL), to analog pin 5 on the Arduino, and pin 5, the data line (SDA), to analog pin 4. On both the SCL and SDA lines, add 4.7K ohm pull up resistors, connecting both lines to +5 V. Finally, wire an LED to pin 1, the AD5171's "wiper", with a 680 ohm LED in series. Image developed using Fritzing. arduino mega - How to 'label' module using electric techniques ... Programming in a unique identifier for the module would be a simple enough task, and that unique ID can then be used to work out what the module is. The DS2431 is pretty cheap too, available at prices around $1.50 and below (much less for bulk and surface mount). You can also get bigger versions for storing more data should you want to. Share
Simple Labs' Quick Start Kit for Arduino: Simple Labs' Quick Start Kit for Arduino - 7-Segment ...
Ultimate Guide to Arduino Mega 2560 Pinout, Specs & Schematic There are 4 UART in Arduino Mega: Pin 0 - RXD0, pin 1 - TXD0 Pin 19 - RXD1, pin 18 - TXD1 Pin 17 - RXD2, pin 16 - TXD2 Pin 15 - RXD3, pin 14 - TXD3 This pin is used for serial UART communication with pc or other serial devices for purpose of data sharing and logging.

29 best Mini Labs images on Pinterest | Lab, Labrador and Labradors
blog.radioartisan.com › arduino-cw-keyerThe K3NG Arduino CW Keyer – Radio Artisan Aug 27, 2020 · I had the same problem. It was kind of a hardware problem. The Arduino can only load round about 28 Kb of code. Try to comment some code so that you get under the magic number. At least it worked for me. And that was one of the reasons I still consider using the cw-keyer with the LCD-Shield with a Mega-Arduino. My Adafuit shield arrived today.

Pin on Arduino
ATmega2560-Arduino Pin Mapping | Arduino Documentation LAST REVISION: 07/07/2022, 02:50 PM. Below is the pin mapping for the Atmega2560. The chip used in Arduino 2560. There are pin mappings to Atmega8 and Atmega 168/328 as well. Arduino Mega 2560 PIN diagram.
Arduino Mega Tutorial – Pinout & Schematics
Arduino Mega Tutorial - Pinout and Schematics. Mega 2560 Specifications It is also compatible with the different type of boards like high-level signal (5V) or low-level signal (3.3V) with I/O ref pin. Brownout and watchdog help to make the system more reliable and robust. It supports ICSP as well as USB microcontroller programming with PC. The Arduino Mega 2560 is a replacement of the old Arduino Mega, and so in ...

Pin on Arduino
Arduino Mega Mega2560 I2C on pins A4 and A5 for Arduino UNO shield ... No, the I2C is fixed to the specific pins for a ATmega2560 microcontroller. I can think of two things, perhaps someone else can think of a third one. You could try a software I2C library on pin A4 and A5. Here is a list of those libraries: Arduino I2C libraries · Testato/SoftwareWire Wiki · GitHub
Week 14
twitter.com › cityofcalgaryCity of Calgary (@cityofcalgary) | Twitter Official City of Calgary local government Twitter account. Keep up with City news, services, programs, events and more. Not monitored 24/7.

Microcontroller Labels - Arduino pinout | Freetronics
0.91 Inch OLED I2C Display 128 x 32 | Arduino Tutorial Start the Arduino IDE application. Use the top menu bar to select Tools → Manage Libraries... This opens the Library Manager dialog box. In the Library Manager dialog box, type SSD1306 in the search field, as shown in the image below. Select the SSD1306 Driver in the Arduino IDE
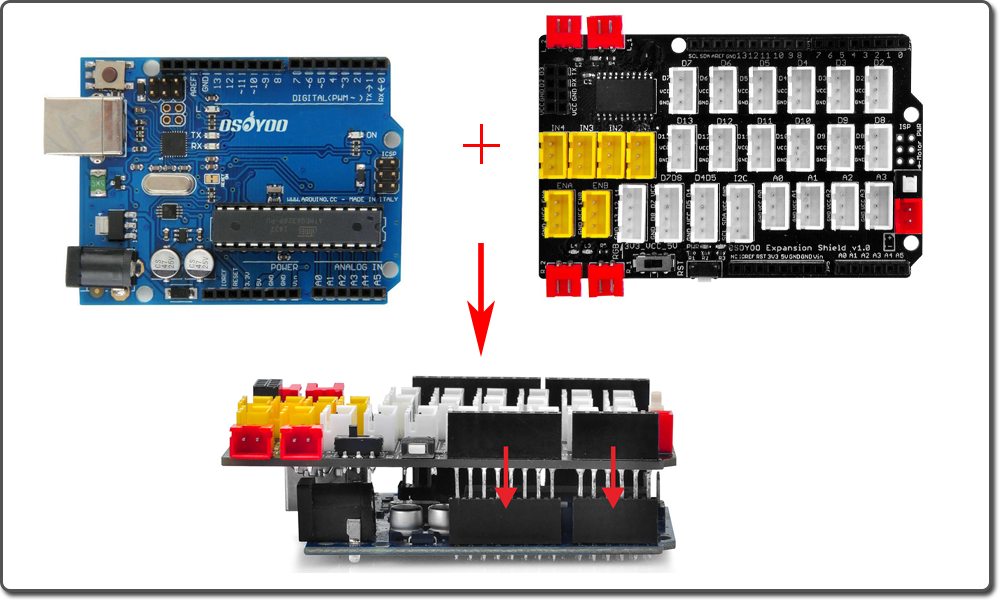
Arduino Graphical Programming Kit Lesson5 – Using a button to control a LED « osoyoo.com
How to Setup I2C Communication on the Arduino - Circuit Basics To blink the pin 13 LED on the Arduinos, we need to do the following: Add global variables byte i2c_rcv, int time_start, stat_LED and byte value_pot at the top of our sketch Initialize values of the global variables inside the setup () section Initialize pin 13 of the Arduino as an output pin using pinMode ()

CODE | H i F i D U I N O
0.96 Inch OLED I2C Display 128 x 64 | Arduino Tutorial In this tutorial a 0.96 inch monochrome OLED display from Geekcreit is connected or interfaced to an Arduino. Libraries are then installed and some example programs run which show how to use the display in an Arduino sketch. The display connects to Arduino using only four wires - two for power and two for data, making the wiring very simple.

Circuits for beginners: november 2009
Arduino Mega Pinout Diagram - Use Arduino for Projects Arduino Mega Introduction: The Arduino Mega is a microcontroller board based on the ATmega1280 (datasheet). It has 54 digital input/output pins (of which 14 can be used as PWM outputs), 16 analog inputs, 4 UARTs (hardware serial ports), a 16 MHz crystal oscillator, a USB connection, a power jack, an ICSP header, and a reset button.
Post a Comment for "39 iic pin labels in arduino mega are"